
USER GUIDE
Dedoose is an easy-to-use, collaborative, web based application that facilitates all types of research data management and analysis.
Here's what you need to know about how to use it.
Download full User Guide here:
DownloadDownload full User Guide here:
DownloadMemos
The use of memos is an important part of many methodological traditions and educational and teamwork practices. For example, they are key to best practices in grounded theory in the tracking of design and analytical thinking during a project. Memos can be very useful to support a rigorous code system development process in collaborative qualitative and/or mixed method research. Further, memos can be used to communicate to students or research team members over the course of a class or research project. The memo system in Dedoose, fully revamped in late 2014, is designed to be as flexible as possible to allow for any researcher, team, or instructor to make use of the system in efficient and effective ways.
Memos in Dedoose are organized in a custom, user-defined, group structure depending on a project’s specific needs. Memos can be free floating, not linked to any items in a project database, or linked to any number of items. Being able to build groups for memos gives the researcher the freedom to organize memos in any number of ways. Finally, Dedoose memos can be easily exported to Word files for local use in manuscript preparation, fodder for team discussion, data sharing, and report generation.
Examples of how one can use the Dedoose memo system include:
- Free floating memos, stored in an ‘analytical thinking’ group, created over the course of a project from a more reflective, grounded theory perspective. Such memos might include thoughts about observations within the data and the types of codes needed to sufficiently frame the analysis at different stages of the project. These memos can be exported later and organized by date to see how the framing and understanding of data has evolved. Also, these, or any, memos may be linked to exemplar data in the project for further contextualization of the memo content upon review.
- Free floating memos created in an ‘assignments’ group created by an instructor or team leader to communicate particular tasks for others linked to the project. Ex. a ‘Week One’ memo with content like, ‘here’s what I’d like you to be doing this week.’ These memos can be viewed by students or team members so they know what is expected of them in a particular time period.
- Mapping project activity memos in a ‘project path’ group also created over the course of a project to document milestones—essentially documenting the ‘conversation’ among team members as thinking evolves over the course of a project. In this group, team members might write memos related to: proposed or actual code tree restructuring with content about the rationale for and changes made to a code system/tree, perhaps reconfiguring into a hierarchical structure, at a particular point in time; proposals for new codes; and/or recommendations for revision to code application criteria. Again, any memo can be linked to associated content and when exported the linked content can be included so the team has all the information necessary to discuss the theoretical meaning and value of making changes in the context of real data toward a more accurate representation of the data.
The Memos Workspace Pop-Up
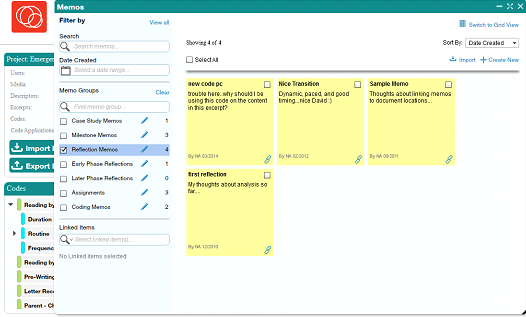
The Memos Workspace is a movable and resizable pop-up in Dedoose. As seen in the left panel in the above snapshot, the workspace includes fields for filtering by memo title, content, date of creation, groups, and/or linked items. This example shows the memo filtered to just those in the ‘Reflection Memos’ group. From this view memos can be created, opened, edited, added or removed from groups, imported, and deleted. Further, when one or more memos is selected, context menus for exporting, adding to new groups, and saving as documents to be treated as media in the project for excerpting and tagging will appear above the selected memos (as shown in the next screen shot).
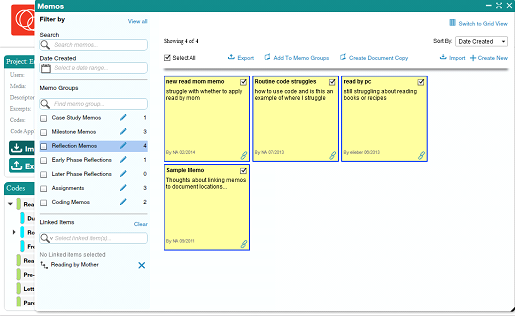
Finally, it is important to note that the Memo Workspace and memos can be left open when working on other aspects of a database and, if needed, resized or minimized to allow for easier viewing and navigating in other Workspaces.
Creating a New Memo
Memos can be created within the Memos Workspace or created and linked directly to any object in Dedoose. To create a new memo in the Memos Workspace:
- Go to the Memos Workspace by clicking the Memos tab in the main menu bar
- Click ‘Create New’ in the upper right section of the Memos pop-up
- Enter a title and the text for the memo
- Add the memo to one or more existing groups by clicking the Memo Groups search field and selecting groups, or
- Create a new group for the memo by typing a title for the new group in the Memo Groups search field
- When ready, click the ‘Save’ button on the bottom right of the pop-up
- Continue to edit or add the memo to groups and, when finished, click ‘Save’ and then close the memo.
Note that new memo groups can only be created when creating a new memo or editing a memo. Once the group is created, it can be used to link or remove other memos.
Linking Memos to Database Objects
While it is not necessary to link a memo to an object in Dedoose, it is often desirable and this can be done from the Memos Workspace or when working with the object in question.
To link a new or existing memo in the Memos Workspace:
- Go to the Memos Workspace by clicking the Memos tab in the main menu bar
- Create a new memo (and click ‘Save’ to prep for linking) or open an existing memo
- Click the ‘Memo Links’ button on the bottom of the pop up
- Search for the object you would like to link. This can be a code, excerpt, media file, or descriptor. Note that the search field can be used as a filter and, by clicking the ‘magnifying glass’ icon in the search field, you can also limit the types of items displayed
- Select any items you wish to link
- Click ‘Save’
- Close the memo.
To link a new or existing memo directly to an object:
- Open up the ‘Memos’ button or icon associated with the object you wish to link
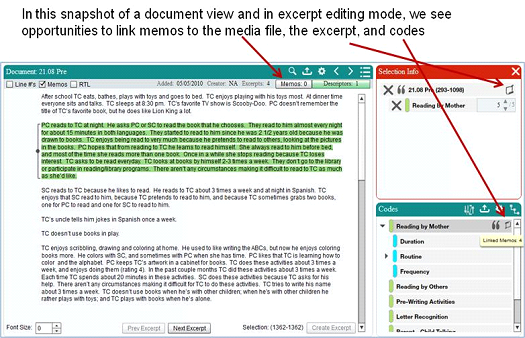
- Upon clicking the memo button or icon you are presented with a memo pop-up with options to create a new memo for linking or to link an existing memo. Here is an example of selecting ‘Create New Memo,’ selecting the ‘Coding Memos’ group for storage and providing a title and content:
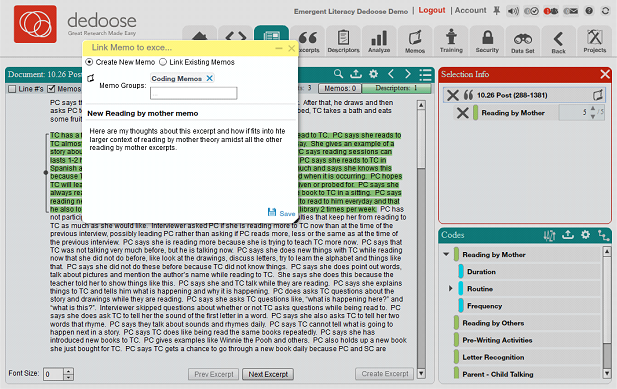
Click Save to link memo and you can then link additional new or existing memos to the object or exit the routine:
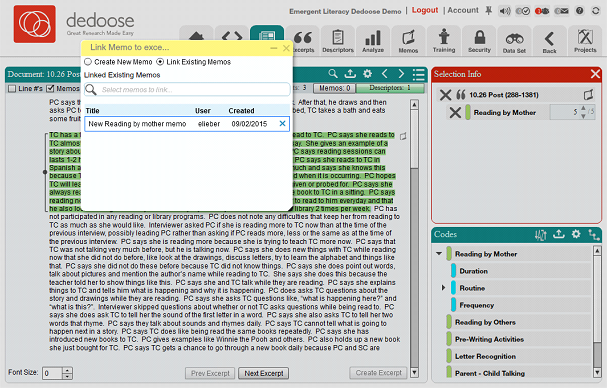
Finally, again, the memo, or other newly linked memos, can be left open, resized, minimized, and/or moved if you wish to add content as you carry out further excerpting activities.
Exporting Memos
To export any or all of your memos:
- Open the Memos Workspace by clicking the Memos tab in the main menu bar
- Filter as desired and manually select memos to export or click the ‘Select All’ option
Click ‘Export,’ select the appropriate format, provide a description (if desired), and select any additional information you wish to include in export (note that while excerpt text, codes, and descriptor content will be included, only media titles will be present in export):
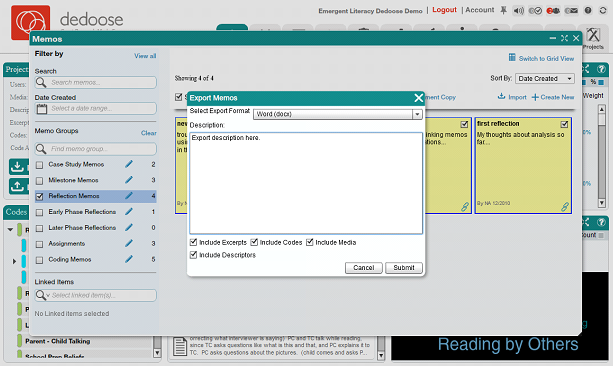
Click ‘Submit’
- Click ‘Ok’ when download is ready
- Choose the location where you wish to save the file on your computer and, if needed, change the file name
- Click ‘Save’
- Click ‘Ok’ when download is complete.
Importing Memos
The memo importing feature allows users to share memos and associated content from one Dedoose project to another. To import memos:
- Go to the Memos Workspace by clicking the Memos tab in the main menu bar
- Click the ‘Import’ button on the upper right portion of the pop-up
- Select a XML file that was produced when exporting memos from another project to a XML format
- Click ‘Open’ to complete import.
Tile or Grid Viewing
In the Memo Workspace, you have the option to view memos in a tile format (the default) or a grid format. You can toggle these views by clicking the ‘Switch to Tile (or Grid) View’ option in the upper right corner of the pop-up.
Sorting Memos
When in the Memos Workspace you can use the ‘Sort By:’ drop down menu items to sort your memos by Date Created, User, or Title Creation Date. When in Grid View, you can also sort by any of the columns by simply clicking the column header.
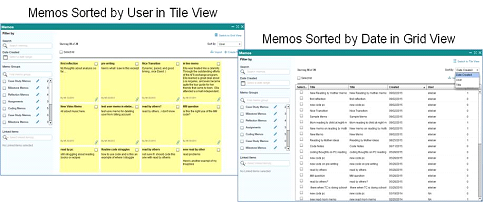
Editing and Deleting Memos and Memo Groups
To edit memo text, title, or groups a memo belongs to:
- Open the memo you wish to edit by clicking on it in the Memo Workspace or when accessing memos linked to objects
- Edit the text, the title, or the groups to which a memo belongs to by adding new groups or removing by clicking the ‘x’ next to an existing group
- Click ‘Save’
- Close the memo when finished.
To delete a memo:
- Open the memo you wish to delete by clicking on it in the Memo Workspace or when access memos linked to objects
- Click the ‘Delete’ icon in the lower right corner of the memo view
- Click ‘Yes’ to confirm delete and memo will be deleted.
To edit or delete a memo group:
- Open the Memos Workspace by clicking the Memos tab in the main menu bar
- Click on the edit icon next to the group you wish to edit or delete—the snapshot below shows your memo group editing options
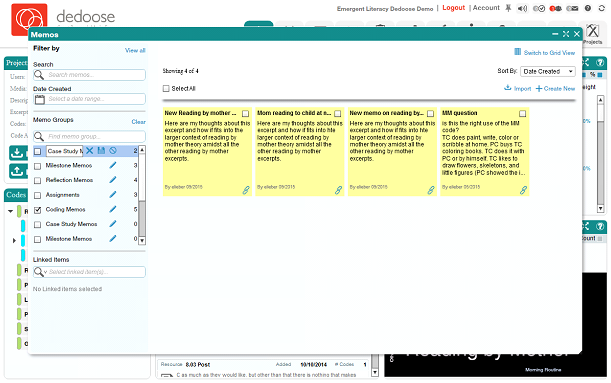
- Edit the group title and click the save icon, click the ‘X’ icon next to the group title to delete the group, or click the cancel icon if you change your mind and you’ve completed making the desired changes.
To add multiple memos to the same Memo Group:
- Open the Memos Workspace by clicking the Memos tab in the main menu bar
- Select any memos you wish to add to a group as a batch
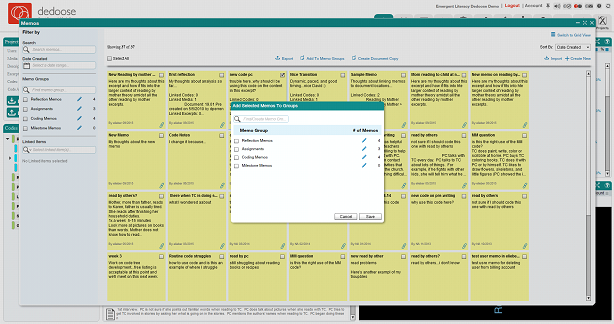
- Click the ‘Add to Memo Groups’ icon that appears above the memos panel
- You can add a new group by typing it into the search field and clicking ‘Add New Group’ or you can select an existing group
- Check the boxes next to the group(s) to which you want to add the memos
- Click ‘Save’ (Below is the ‘Add to Memo Groups’ pop-up).
Saving a Memo as a Project Document for Excerpting and Tagging
To save memos as project media files so you can excerpt and tag content:
- Enter the Memos Workspace by clicking the Memos tab in the main menu bar
- Select the memos you wish to save as media files
- Click the ‘Create Document Copy’ icon that appears above the memo panel
- Click ‘Ok’ to the alert that the documents have been created
- Close the Memos Workspace and you will find the new documents among your media files.

