USER GUIDE
Dedoose is an easy-to-use, collaborative, web based application that facilitates all types of research data management and analysis.
Here's what you need to know about how to use it.
Download full User Guide here:
DownloadDownload full User Guide here:
DownloadThe Code Tree
The Dedoose Code Tree is flexible, dynamic, and rich with features. Thoughtful use of code definition and weighting systems and the structure of the code tree will be central to the value of your work. Note that we use the terms 'code' and 'tag' interchangeably in Dedoose. While codes and tags may be understood to represent different things, their functionality in Dedoose is identical. Code specific editing controls appear when floating the cursor over an existing code and clicking the 'edit code' icon.
Above the Code Tree on the right are four buttons that will help you arrange and control how codes function as you work. The first button going left to right will be a magnifying glass that will search the code tree for a keyword. Second is the settings panel where you will find these functions:
- Activate or deactivate the 'upcoding' feature which, when activated, serves to automatically apply any super-ordinate codes when applying a child or other subordinate code.
- Sort the code tree alphabetically
- Code Counts will toggle whether you can see the raw code counts in the code tree
- Color Scheme will toggle whether the system chooses the color associated with your codes or you use your own custom color scheme
The third button is the Actions Panel:
- Collapse/Expand will either drop down each child code for display, or collapse them back up so only the parent codes are displayed
- Retroactive Upcode will apply the parent codes over any already applied child codes
- Reorder Codes will open a window allowing you to move your codes up or down, so you can arrange them as you wish
- Import Codes will prompt you to select a file to import
- Export Codes will prompt you for a file format to download your code tree into
The fourth and final button is for adding a new code. When adding a new code to the tree, you are presented with the ability to provide a title, descriptor, and activate (and set parameters for) a code rating/weighting dimension. Note that all of this information will show up as a smart-tip when floating over the code, so is a good place to note any tips or reminders on how to use the code.
Editing an Existing Code
Anywhere you can view the code tree, you can float over an existing code to view options to link a memo, edit the code, or add a root code. When editing the code you will see options to edit the initial information provided when creating the code as well as buttons to:
- Delete the code
- Merge the code with another code (which will lead to re-coding any excerpts with the primary code selected and then removing the code itself from the tree)
- 'Re-Parent' the code if it is currently subordinate to another code in the tree
- 'Make Root' which will move the code from any subordinate position to a root level.
- Finally: Be sure you are aware of the 'Quick Code Widget', you can learn more about it in this section of the User Guide.
Custom Colors
When creating a new code, you have the option of choosing a custom color. By default, the system chooses the colors for you as you work. However, for our users that are more visually inclined and like to keep things arranged in a particular way you may want to control the colors and which codes are associated with which colors. You will need to set the color scheme for your codes to 'custom' from the settings panel in the code tree. You will also want to be careful to choose colors for each code, as the default color is black and having a dozen codes all show up black can be a bit obscuring.
Upcoding:
Automatic upcoding applies the parent of any child code at the time the child code is applied to an excerpt. By default, this is deactivated and applying a child code to an excerpt will only apply that specific code.
- Click the Home tab
- Go to the Code Pane on the left
- Click the Show Settings Panel button
- Toggle “Automatic Upcoding” to On
Retroactive Upcoding:
Retroactive upcoding checks every excerpt in a project and applies parent codes to excerpts that have a child code applied, but not the parent code. Note that anytime you decided to use this feature, you might want to first make a copy of the project as a backup in case the result of the procedure is not what you expected or desired.
- Click the Home tab
- Go to the Code Panel on the bottom left
- Click the Show Actions Panel button
- Click Retroactive Upcode button
- Read and click Submit if you agree
The Quick Code Widget
The fastest way to create codes and code excerpts is with the Quick Code Widget. This feature allows the use of keyboard shortcuts to maximize efficiency when coding text documents. Here are the steps to use this awesome feature:
- Highlight the text you would like to code
- Hit your keyboard space bar to open the Quick Code Widget
- To apply an existing code either: a. Type code name or scroll to an existing code with your arrow keys and with code highlighted hit your Enter key or b. double click on the code to create excerpt and apply the code
- To create and apply a new code: Type the name of the new code in the search field and hit your Enter key to add the code to the tree, create the excerpt, add apply the code to the excerpt
When you apply a code with the Quick Code Widget: once the first code is applied, the ’Selection Info’ panel in the upper right corner will change to orange to indicate you are in excerpt editing mode and where information about the excerpt will appear.
Codes with Shared Subtext
If you have multiple codes that appear with the same subtext, typing into the search field may leave you with both so you can use the arrow keys to scroll down the list of codes and hit ‘Enter’ to apply the highlighted code of choice.
Adding a New Code with Existing Subtext
To add and apply a new code that’s title exists within the subtext of existing codes (ex. ‘reading duration’ and ‘reading frequency’ exist as codes and you wish to create new code called ‘reading’), type the name of the new code and use the command ‘Shift’ + ‘Enter’ to create the new code and apply it to the excerpt (where clicking ‘Enter’ alone will serve to apply whichever existing code that is highlighted after you've typed the name of the new code).
Finally, note that the Quick Code Widget is a movable and sizable panel. Leaving the panel open means it does not need to be reactivated for each excerpt or document you are coding.
Importing and Exporting Codes/Tags
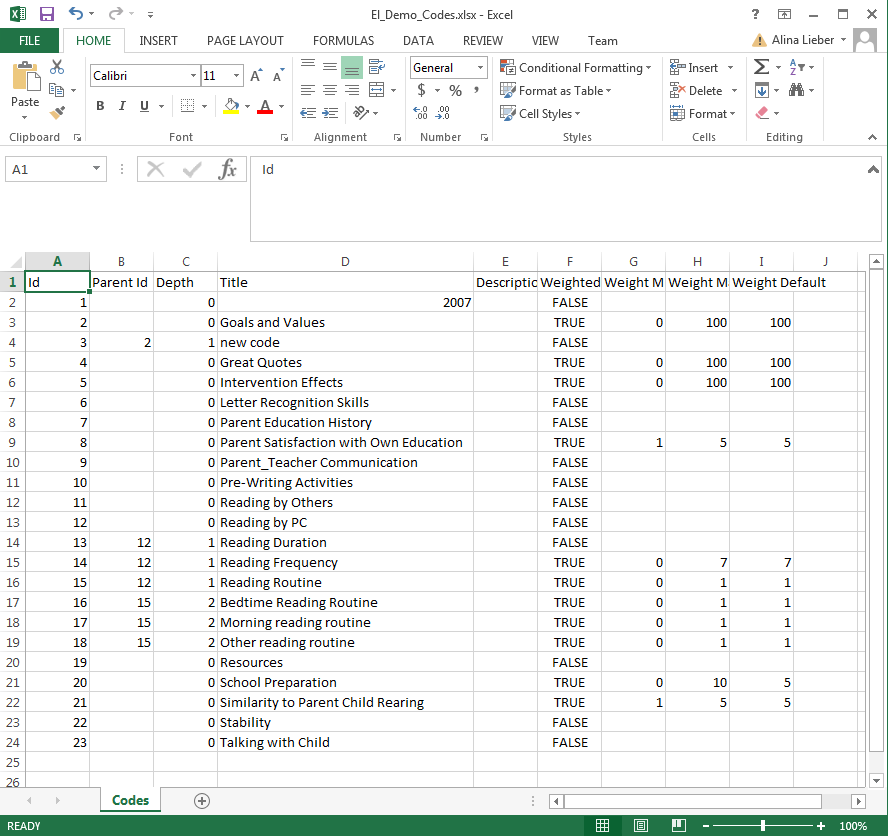
Code/Tag systems can be imported and exported to and from MS Excel (and other formats) and exported to MS Word with the option to also export all coded excerpts. This feature can be helpful in the preparing of reports and for sharing code systems from one project to another.
- To Export Codes - click the ‘Export Codes’ button in the code panel header, select the desired format and whether to include coded excerpts, and click ‘Submit.’
- To Import Codes -enter code tree editing mode, click the ‘Import Codes’ button, locate the file you wish to import, and click ‘Submit.’
Exporting codes to a Word format also allows you to include all excerpts associated with each code, so is a quick way to export all project excerpts organized by the code tree.
Note that you can also import and export codes with the 'Import Data' button and 'Export Data' buttons on the Home Dashboard.
Here is an example of what the code system looks like in Excel:
Excerpting, Coding, and Weighting Text
Quick Code Widget
The fastest way to create and code excerpts is with the Quick Code Widget. This features allows the use of keyboard shortcuts to maximize efficiency when coding text documents. To learn more please see the Quick Code Widget section of this user guide.
Excerpting and Coding Text Documents Manually
Excerpting and coding can also be done through a multi-step process. This is the best option if: you wish to create excerpts prior to developing your code system, if you are looking to build a hierarchical structure to your tree as you move through the excerpting process, or if you wish to take advantage of the document cloning feature.
Document Viewing and Excerpt Creation
- Open a text document by selecting it from the ‘Media’ list on the Home Dashboard or the ‘Media’ Workspace
- Use your cursor to highlight/block the desired section of text (see Text Searching in the Working with Documents section above for details on how the search tool can assist in locating meaningful content)
- Click the ‘Create Excerpt’ button at the bottom of the document panel OR right click on your mouse over the region and select ‘Add Codes’ from the context menu that pops up
- Upon creating a new excerpt (see illustration above)
- The system will enter excerpt editing mode
- The selected section will be highlighted in a bolder green color
- A bracket will appear in the margin defining the excerpt boundaries
- Colors on other excerpts will be faded
- The ‘Selection Info’ panel header will change from blue to orange as an indicator you are in editing mode
- Codes can be applied by double-clicking a code in the ‘Codes’ panel or by dragging and dropping a code into the ‘Selection Info’ panel
- Code weights/ratings can be set after the code is applied (if applicable)
- Codes can be deleted from the excerpt by clicking the ‘X’ next to the code in the ‘Selection Info’ panel
- Excerpts can be deleted by clicking the ‘X’ next to the Excerpt icon in the ‘Selection Info’ panel
- You can re-enter excerpt editing mode by clicking the bracket in the margin that defines the boundaries of the excerpt
- Click anywhere in the document to exit editing mode.
Editing Excerpt Length:
Excerpts within audio, video, images and PDF files are editable by adjusting the boundaries whenever selected, however text excerpts are changed with a different set of steps:
- Open a document
- Click the bracket to the left of the excerpt to reactivate ‘excerpt edit’ mode
- Right click where you would like the excerpt to start or end
- Click Set Excerpt Start or Set Excerpt End
Code weighting
Code weighting can be activated for use at any time. It is often the case that a meaningful code weighting system will not emerge until the nuances of meaning in the data become clearer to the research team. That is, while scalable distributions of a code may emerge when sufficient data has been examined, a useful and precise weighting scale definition and application criteria often only follows a certain amount of preliminary data exploration. Accordingly, it is often preferable to begin the coding of excerpts either without defining a code-weight system or by simply accepting a weight default value. Following adequate data analysis and weight scale definition, the weighting scale can be meaningfully defined and the user can then return to previously coded excerpts to set the weight according to the newly defined system.
Code Weight Auto-applying:
Applying codes with code weights to a number in documents will automatically apply that number as the code weight if it is within the range defined by the code weight minimum and maximum values you defined.
- Open a document
- Highlight a number in a text or PDF file (123, .20, 1.2 million, etc will work)
- Apply a code with weighting enabled
- Inspect the Selection Info box on the top right, the number will be automatically applied
Excerpting, Coding, and Weighting Images and PDFs
Dedoose makes it easy for you to import existing media files for your qualitative data, regardless of whether they are stored as spreadsheets, text, images, audio, or video.
These data may be field notes, observations, interview or focus-group transcripts, manuscripts, pasted images, audio streams, photographs, video streams, hyperlinks, survey data—anything that you can store as a text, spreadsheet, audio, or video file (.doc, .docx, .rtf, .txt, .pdf, .xls, .xlsx, .csv, .tif, .jpg, .png, .gif, .mp3, .mp4, .wma, and .m4a).
To import your files, start from the Project Workspace dashboard and click the Import Data icon in the upper left panel. You will then see a pop-up menu where you will indicate the type of data you are importing. Locate the files and submit. Note that you can also import data in many of the other Workspaces.
Survey Importer
The Dedoose Survey importer is one of our proudest achievements. This will take an existing data set in excel and transfer all the data into Dedoose. While powerful and intuitive, our survey importer works best when you follow the format discussed below.
Survey to Dedoose Project Creation
Creating fully populated Dedoose projects from SurveyMonkey or other data collection service output is an increasingly popular feature in Dedoose. Here's an overview and instructions on how to prepare data from survey responses and open-ended questions stored in an Excel file. Two main things to note:
- For any demographic and scale response data, the resulting Dedoose descriptor fields will be identical to what is specified in the column header and the valid values will be whatever data are located in the cells for each case
- For the qualitative/open-ended narrative data, the content of these cells in each column will be extracted, compiled into a single document for each participant and each response excerpted and tagged with the corresponding column header. So, the column headers for these data will become the automatically generated code system.
To make this process most efficient and the results most useful, here’s what is required/recommended:
- For all columns containing closed-ended (descriptor) data, change all column headers to appropriate labels that make intuitive sense for a descriptor field. For example, with a question like 'Please indicate your age group,' you'll want to change the column header to 'Age Group.' Then if the data are represented by numeric proxies, e.g., 1, 2, and 3, with 1 = 10-25 years, 2 = 26-40 years, 3 = 41-50 years, you'll be happiest in Dedoose if you user the actual values by changing 1s to '10-25 years' the 2s to '26-40 years and so on. This is a fairly straightforward process with Excel’s search-and-replace feature.
- For columns containing qualitative (narrative or open-ended) data you will want to change the header to whatever will be most informative as a code. For example, a header like 'Please describe your experiences with X,' might be shortened to 'X experiences'.
- For columns with continuous numeric data, you will be happiest if, wherever possible, you convert these data to a categorical form. For example, imagine you've collected data from a depression scale where scores can range from 0 to 100. From clinical practice or other guidelines, we may know that scoring between 0 and 50 is considered 'not depressed,' 51-70 = 'minimally depressed,' 71-85 = 'moderately depressed,' and 86+ = 'severely depressed.' Converting these data prior to import will allow you to explore your excerpting and tagging activity as a function of these groupings. Similarly, if you collect age information in a numeric form, it is in your interest to consider how you will be wanting to 'slice up' the qualitative excerpting and tagging activity by creating groups that will make sense given you analytic plans. Keeping in mind that many Dedoose charts and filtering capabilities are based on descriptor data, doing such a conversion puts you in control of the groupings. The Dedoose charting engine will create groupings automatically from continuous numeric data, but the algorithm is arbitrary, so can be of limited utility
- Save this file to your local computer
- Create a new project in Dedoose via your ‘Projects’ workspace
- Click the ‘Import Data’ button in the upper left panel in your new project’s home dashboard (the panel with the project summary data)
- Select Import Spreadsheet
- Locate the Excel file with the project data and ‘Submit’
- Voilà, your project is now all set and ready for more nuanced coding and data analysis.
Information on Specific Use Cases:
_ddqual_ to both force qual fields and to force titles for your docs
The survey import tool generally does a great job distinguishing close-ended descriptor data from narrative responses. The algorithm for doing so depends on what is found in a column based on the number of unique values (ex. gender would be 'male' or 'female') and the number of characters. Occasionally, you may have a qualitative field that has short responses or similar responses across participants that is misread as a descriptor field instead of an open ended field. For cases just like this, our Tech Team built a way for you to force the system to recognize these fields as qualitative:
- Open your Excel file
- Navigate to the columns that you would like to demarcate as qualitative
- Add "_ddqual_" to the front of the column title, without quotation marks and spaces
- Save the file
- Import it into Dedoose NOTE: If you follow these steps for the first column, Dedoose will name each of the documents after the value in the column title.
Consolidating columns with the same title in a spreadsheet file:
Importing your data into Dedoose via a spreadsheet automatically defines descriptor fields, creates descriptors, creates codes, converts any narrative responses to tagged excerpts within a document for each case, and links the document to the appropriate descriptor. The importer does this by checking each column title, examining the data in each column, and then uses this information to parse the data. Should you have column titles that are not unique, the system will automatically consolidate them into the same question.
To learn about our recommendations on how best to prepare your data for import, please see Working with Media section of this user guide.
Excerpting, Coding, and Weighting Audio and Video
Screenshot of Video Viewer
The process for creating and coding excerpts on audio or video streams is similar to text except you will see either a sound wave or video in the media viewer.
- Open an audio or video file by selecting it from the ‘Media’ list on the Home Dashboard or the ‘Media’ Workspace
- Move along the timeline by letting the stream play or by clicking at a particular location on the timeline to jump to that time point
- The vertical pink bar is the play head
- You can Pause the playback at any time with pause button
- Adjust the blue brackets to define the clip on the stream you wish to define as an excerpt
- Click the ‘Excerpt’ icon in the lower right corner of the viewer
- Upon creating a new excerpt
- The system will enter excerpt editing mode similar to when excerpting text
- The selected section will show a highlighted line along the timeline where the excerpt was created
- The ‘Selection Info’ panel header will change from blue to orange as an indicator you are in editing mode
- Codes can be applied by double-clicking a code in the ‘Codes’ panel or by dragging and dropping a code into the ‘Selection Info’ panel
- Code weights/ratings can be set after the code is applied (if applicable)
- Codes can be deleted from the excerpt by clicking the ‘X’ next to the code in the ‘Selection Info’ panel
- Excerpts can be deleted by clicking the ‘X’ next to the Excerpt icon in the ‘Selection Info’ panel
- You can re-enter excerpt editing mode by clicking the line that defines the location of an excerpt
- Clicking anywhere on the timeline to exit excerpt editing mode.
Keyboard Shortcuts
Keyboarding has been enabled for some of the most frequent audio and video excerpting activities:
- Ctrl + P to toggle play/pause
- Ctrl + Q to create an excerpt
- Ctrl + + or Ctrl + – to move back and forward in the media player
- Ctrl + Alt + +/- to move back and forward in larger increments
- Ctrl + left or right arrow to move to the previous or next excerpt
Code Weighting/Rating
Code weights or ratings can be defined and applied to indicate anything that can be represented on a numerical dimension including quality, sentiment, importance or any other dimension that can help distinguish variation in content where the same code has been applied to sets of excerpts. Dedoose also has a variety of charts that draw directly on these dimensions to expose patterns in both the excerpt content and the investigator determined ‘quality,’ ‘sentiment,’ ‘importance,’ or anything that you’ve decided to index across a code weight/rating system. To learn how to define code weights/ratings, see the Code Tree section of this user guide.
Incorporating code weights/ratings in your project allows you to bring an entirely independent dimension to your database. For example, say we are interviewing parents about what it looks like when they read to their preschool aged child. We might also ask parents to report on a 5-point scale (1 = poor to 5 = excellent) for the quality of their reading. However, parents only know how they read and maybe how a few other people read…and self-reports are subject to a social desirability influence where research shows people tend to over report on positive characteristics or behaviors and under report on negative. As investigators, however, we see all excerpts where parents talk about reading to their child. This perspective lets us see the full range of what reading looks like in the entire research sample and allows us to lay out all the excerpts across a rating scale that we use to index ‘quality’ of reading. Here are a few things to keep in mind as you consider using this feature:
- Only some codes will lend themselves to such a scaling, but many do, especially if you use your imagination
- These scales are customized depending on how finely you wish to index the coded content—use three points to index ‘high,’ ‘medium,’ or ‘low’ ‘quality’ or fifty points to lay out ‘quality’ across a much broader range
- It is often the case that code weight/rating systems are not defined or put into place until you have become very familiar with your data—maybe at the beginning you think you’ll have a ten point scale, but in the end you find three points is sufficient and all you can reliably distinguish in the real data
- When these systems are in place, there are new sets of patterns to discover and explore and lots of great ‘mixed methods’ analysis you can do…and could never do without them.
Excerpt Reviewing, Additional Coding/Tagging
Excerpts can be retrieved, reviewed, recoded, and exported from many places in Dedoose. These locations include the Excerpt Workspace and the chart selection reviewers that pop-up to show all the active excerpts (‘Hits’) after filtering or drilling-down to the sets of excerpts sitting behind any of the charts, tables, and plots—see the section on analysis for more on how clicking on portions of charts, tables, and plots, pulls up the excerpts represented in the visualizations.
Excerpt Workspace:
In the Excerpt workspace, users can sort and filter sets of excerpts to narrow the focus of an investigation and then review individual excerpts via the SuperMegaGrid. For example, in the following Excerpt Workspace screenshot, excerpts have been filtered to those which meet the following criteria: ‘Not Working’ or ‘Part Time’ working fathers, of ‘Hispanic’ origin, and with ‘Female’ children and then sorted by code (as indicated by the arrow in the ‘Codes Short’ column). This was accomplished by the following steps:
- Click ‘Uncheck All’ in the ‘Columns’ panel to clear the columns in view—this step just helps for clarity
- In the ‘Columns’ panel, select the column ‘Codes Short’
- Open the ‘Fields’ folder in the ‘Columns’ panel and select ‘Father work status,’ ‘Ethnicity,’ and ‘Child Gender’—and you will then see folders appear in the ‘Filtering’ panel and columns will come into view
- Open the appropriate folders in the ‘Filtering’ panel and select ‘Not Working’ and ‘Part Time’ for father work status, ‘Hispanic’ for ethnicity, and ‘Female’ for child gender.
- Sort by ‘Codes Short’ by clicking the column header and, voilá!
- The only excerpts that remain active are those that meet the criteria you set and the subset can now be viewed or selected and exported
- Finally, one can see that floating over an excerpt will bring up a truncated view of the content and any codes that were applied.
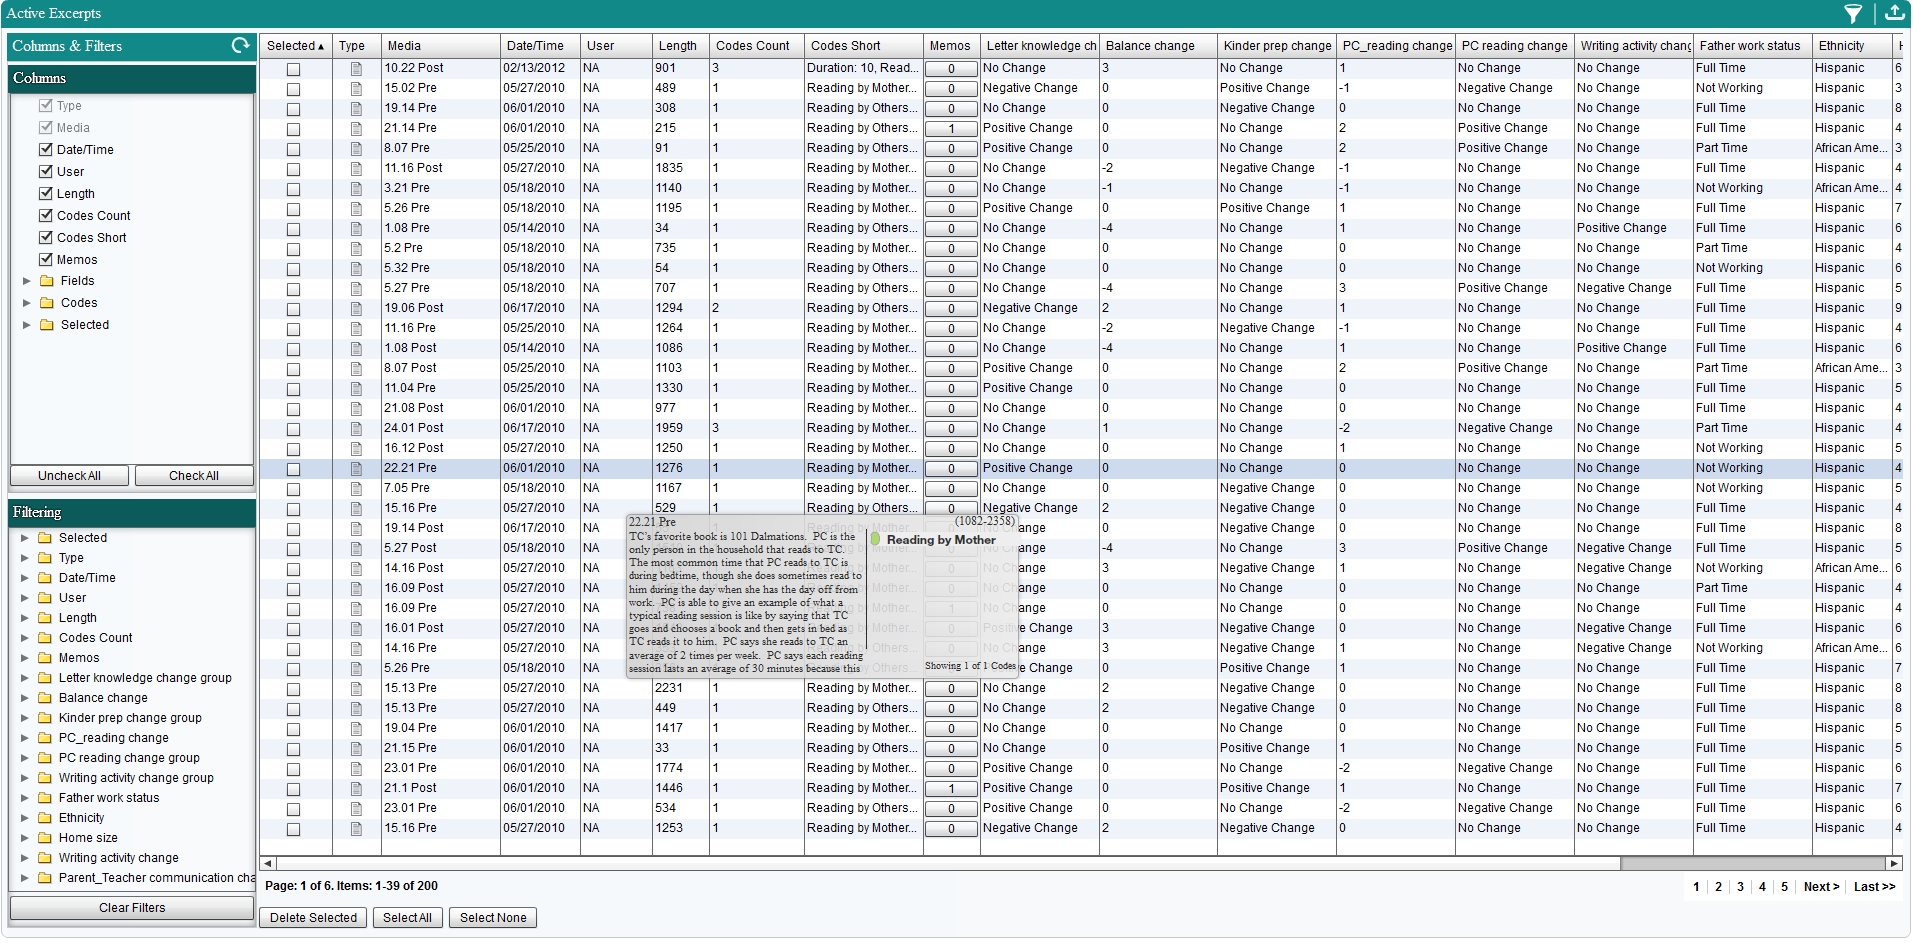
Filtering excerpts in this manner can be very convenient when searching for specific sub-sets of excerpts to explore or export across a larger number of criteria.
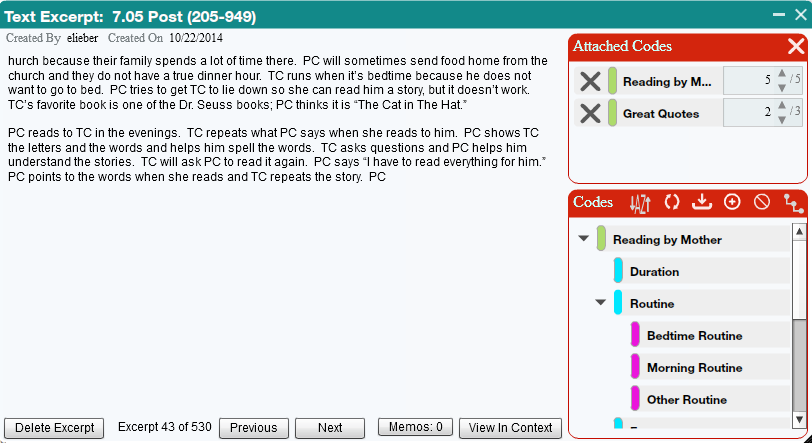
The next screenshot shows an excerpt that had been opened for full review (by clicking on the excerpt in a reviewer or list). This view allows you to:
- Modify the codes applied to the excerpt—remove or add codes/tags—and/or modify the assigned weights/ratings
- Delete the excerpt, by clicking ‘Delete Excerpt’ in the footer
- Review the excerpt in the context of its source document by clicking the ‘View in Context' button at the bottom of the panel
- Scrool forward or backward in the current list of excerpts using the 'Previous' or 'Next' buttons
- Close the excerpt to return to the list by clicking the ‘Close’ button.
Excerpt Review, Recode, and Export after Filtering
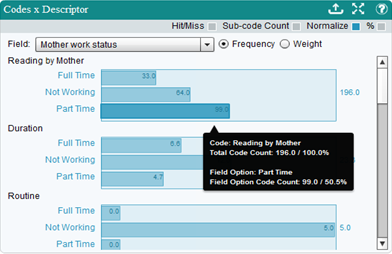
As has been introduced earlier (and also discussed in the Filtering and Analysis section), reviewing and exporting filtered excerpts is an intuitive and transparent process in Dedoose. The following screenshot shows part of the Dedoose Home Dashboard where one of the basic charts in Dedoose are shown with the information that appears when floating over one of the bars. Here we see the relative frequency the ‘Reading by Mother’ code was used across ‘Mother work status’ groups. The smart tip shows the metrics on the highlighted bar (Part Time working Mothers) with reference to all excerpts with the same code.
Clicking on this bar, activates a pop-up Chart Selection Reviewer containing the set of excerpts sitting behind (and represented by) the bar in this chart. The following screen shot shows this list and a pop-up containing the text of the first excerpt which has been highlighted by floating the cursor over the excerpt.
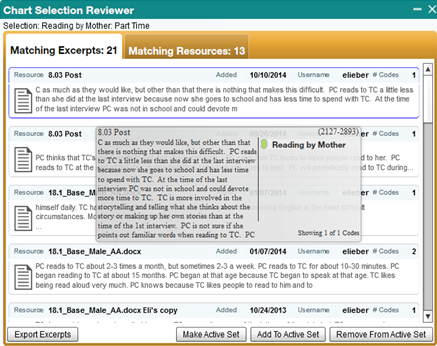
From this listing, excerpts can be quickly:
- Reviewed in truncated form for quick scanning
- Opened for full review, recoding, or weight/rating adjustment by clicking on any of the excerpts listed
- Viewed in the context of their source document and/or
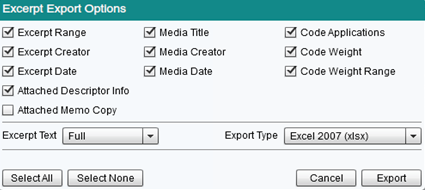
- Exported—clicking the ‘Export Excerpts’ button presents you with a pop-up with set of options to specify the format (i.e., .xls, .xlsx, .doc, or .txt) and information to be exported along with the excerpt (see next screen shot). Once the specifications have been set, click ‘Export’ and follow the prompts to provide a location and title to download the file to your local computer in your format of choice.
